Web Development (COMP 205)
<h1>Welcome to COMP205!</h1>
In COMP205, we are learning to use HTML to create web pages and link multiple web pages together. We will also learn how to control the layout and style of web pages using Cascading Style Sheets (CSS), and to make web pages interactive using JavaScript.
About Your Professor
👋 Hi, I'm Graham! I'm a St. Lawrence College graduate, and I work in the industry as a Software Engineer. I have two cats and two dogs, and I really enjoy teaching!
I got drawn to programming as the logical thinking and problem-solving required really works well for my brain, and I find it incredibly satisfying to finally crack a sneaky bug.
About This Playbook
Web Development (COMP205) Playbook - "The Playbook", is a tool provided to you in order to assist with the course material. It is structured in approximately the same way the course is, and will be a valuable resource throughout the course.
The Playbook is a supplement only!
This Playbook is an evolving book, and it may update periodically with clarifications, so the content may change slightly. The ultimate source of truth for the course material is Blackboard, and this Playbook is provided as a supplement only. Please refer to Blackboard directly for important handouts such as the Course Outline, Learning Plan, and due dates.
Reference
This Playbook can be considered a reference guide for the course. We will refer to this Playbook regularly for informational content and explanations of the course material, including both during lectures and labs.
Exercises
Throughout this book, there will be exercises noted which will help solidify the content within the course. You are highly encouraged to complete these exercises, and they will often be part of the lecture with time provided to discuss them.
Code Blocks
This book will share code snippets in Code Blocks, which you've already seen at the top of this page. This allows the code to be read easily as it will have proper syntax highlighting, but also allows you to copy code snippets directly out of this book. To copy the code snippets, hover over the snippet and there is a Copy button at the top right.
<!-- Hover over this code block to see a copy button! -->
<h1>Welcome to COMP205!</h1>
<p>This code is contained in a code block!</p>
Extra Resources
In this course we will use a combination of resources provided directly to you, as well as external resources such as MDN Web Docs. Please refer to the Extra Resources section of the playbook for an up-to-date list of resources.
Introduction to Web Development
In this course, we will be exploring the basics of web development, and learning how to use HTML, CSS, and JavaScript to build basic web pages.
What is Web Development?
Web Development is a sub-set of development which focuses on building software that is interacted with through the internet. This can be as simple as a basic web page with static text (like this book!) or as complicated as the backbone of an entire business, for example for a Software-as-a-Service (SaaS) application.
Types of Web Development
Web Development is often broken down into different categories, including:
- Frontend Development - Which focuses on what the user sees and interacts with, often written with HTML, CSS, and JavaScript.
- Backend Development - Development focusing on the "brains" of a site that handles more application logic. Backend development is written in many languages, including JavaScript/TypeScript, Python, Java, and more.
- Full Stack Development - Typically refers to developers who work across the "stack", both in the backend and the frontend.
- Infrastructure, Site Reliability Engineering, DevOps - This form of development focuses on the hosting and serving of applications, typically around maintaining a high-quality end-user experience and minimizing downtime.
The "Average Day" of a Web Developer
Web Developer roles vary widely, so an average day is hard to define. It's common for a web developer to spend slightly more than half of their day actually doing programming, with other time dedicated to meetings, understanding requirements, or assisting their coworkers. An excellent web developer is one who is capable both with technical skills, and co-operating with others.
Module 1: Web Page Structure and Navigation
In this module, we will focus on the basics of what a Web Page is, how they're structured, and how they can link to other pages. Primarily focusing on HTML, we will learn how HTML Elements work, how the page is structured, and some level of interactivity provided directly by HTML such as forms and form processing.
Module Objectives
When you have completed this module, you should feel comfortable that you
- Can develop basic web pages with HTML.
- Have a basic familiarity of how HTML works overall.
- Have an understanding of several HTML Elements we introduce in this module, including:
- Headings
- Lists (Unordered and Ordered)
- Tables
- Hyperlinks
- Media such as Images, Sound, Videos
- Forms
HyperText Markup Language (HTML)
HyperText Markup Language (HTML) is the backbone of the web, and is contained on almost every webpage that exists.
History
Like so many things in software development, HTML started as a problem that needed to be solved. CERN researchers found their ability to share information with each other was disorganized at best, and researchers were worried the lack of a central source of information would mean that information would be lost, especially on larger projects.
To solve this problem, Tim Berners-Lee created a program internal to CERN that defined a structure with which scientists could share information with each other. This program worked well for them. Based on this project, Tim Berners-Lee proposed an internet-based markup language to allow for easier information sharing over the internet. This was the proposal for HTML.1
So what is HTML?
To understand the purpose of HTML, we should first understand where the name comes from. Breaking it down, there are two things we should care about:
HyperText
HyperText is text which contains links to other text you can immediately access, and these links are called Hyperlinks. This Playbook is an example of a simple collection of HyperText, as throughout the book you can click on other links to go to a different section of the book, read something external, etc.
Another example of HyperText is the Wikipedia article on Hypertext. In this article, you can click to other articles, descriptions, references, and read them instantly.
Markup Language
A Markup Language is a standard set of rules that are defined for writing text. We use Markup Languages to ensure that text is written in a standard way that can be understood by computers, and processed accordingly. By following the rules of a markup language, computer programs are able to understand the intent behind how you'd like your content to be displayed.
Other examples of markup languages aside from HTML include Markdown and LaTeX.
Putting it together: HTML
HTML then is a set of rules on how to create documents that can be linked together. Web Browsers understand what the rules mean, and so they will link web pages together without you needing to do any additional work to make references work.
HTML Pages are very simple and can be created in just a few lines of code. Your existing web browser already knows how to handle HTML files, and so you don't need to install anything to get up and running right away. Try the following:
- In your COMP205 directory, create a new file. Call it
hello_world.html - Copy the text below into the file.
- Save the file, and exit.
- In your File Explorer, double-click on the HTML file to open it.
Your file should open up your default web browser. You just created your first web page! It's a pretty boring web page, but it's a web page. If you send this page to someone else, they'll see your heading in larger, bold text, and your regular text. This was encoded directly in the HTML file.
<h1>Hello, COMP205</h1>
<p>This is a fully functional webpage, although maybe a bit boring...</p>
Now, modify your file to add some new text. Add a sub-heading (<h2>) and write whatever you want. What happens when you make these changes?
Tip: If you modified your file and nothing's changing, close and re-open the file. Why do you think you have to do that?
Original HTML Proposal: HTML Proposal: Tim Berners-Lee
The HTML Element
Basic Structure
The structure of HTML is built using elements. In general, an HTML Element contains three components:
- A start tag.
- Content
- An end tag.
<h1>Hello World!</h1>
In the above code example, the Start tag is <h1>, the content is the string "Hello World!", and the end tag is </h1>.

Be aware! Not all HTML Elements have content. One example is the <br> element, which represents a line break. If an element does not have content, then it also doesn't require an end tag (as there's no need to signify the end of the content.)
Not Case Sensitive
HTML Element tags are not case sensitive, meaning the following two lines of code are identical as far as HTML is concerned:
<H1>I am a heading.</H1>
<h1>I am a heading</h1>
However, it is standard in most cases to do HTML tags in lowercase, and so we will follow that standard in this course.
Attributes
w3schools provides a fairly comprehensive overview of element attributes that doesn't go too in depth, you may find this helpful.
HTML Attributes provide additional information about elements. They are a way to provide details about how an element should be used and represented in the template. For example, with the following code representing an image:
<img src="image.jpg" alt="A descriptive text">
the img element has two attributes. The first attribute is a src (source), which provides the file that should be placed where the image is located. The second is alt (alternative) text which displays when an image fails to load, and is also used by screen-readers and other accessibility tools to allow users who may be unable to view images to understand the content of the site.
Nesting Elements
In HTML it's very common to nest elements into other elements. In this case, the content of one element may include other elements in addition to other things. For example, in the following code snippet:
<div>
    <h1>This is a title!</h1>
    <p>This is a paragraph.</p>
    This is plain text content.
</div>
- The div element contains an h1 element, a p element, and some plain text.
- The h1 element contains plain text.
- The p element contains plain text.
When nesting elements, ensure to indent them per the course coding standards.
Basic Page Structure
As we've discussed already, HTML is structured in a way that makes it as easy as possible to share text-based information. Regularly, we need to display this information in a way that clearly groups different parts of the information together.
This is an example of an Info callout. This callout is an example of a set of information being displayed differently than the rest of the page. In the case of info boxes like this, they serve as a visual highlight which can represent very important information, or information that diverges slightly from the main content of the page.
This info box is contained within a structural element called a <div> that modifies the styling of this content only to catch your eye.
Structural Elements
Structural elements, or block-level elements, are elements which allow you to group elements together and modify them as a whole. For example, you may want to make all the content in the "main" area of your website centre-aligned, but keep the sidebar content left-aligned. Or perhaps you want a different background colour for your header than you do for the main body. These are all options which can be controlled by the use of structural elements.
The most common structural element, and the most generic, is the <div>.
<div> Element
A <div> (division) element defines a separate section of an HTML document. It can be considered a container, which doesn't do anything on its own1 but that allows you to do things to all of the elements contained within it as a group.
A div can be styled independently, which means you can, for example, set a background colour for an entire area in your page, rather than just individual elements.
<!-- Imagine we want to hide an entire section of content. Rather than add the ``hidden`` attribute to each element individually, we can wrap all of the elements in a <div>, which we can hide instead. -->
<div hidden="true">
    <h1>This is a hidden header.</h1>
    <p>This is a hidden paragraph.</p>
</div>
Technically, browsers put a linebreak before and after new div by default, so I suppose you could use a <div> as an unnecessarily complex <br>, but let's not.
Semantic Structural Elements
In modern websites, there are common sections of a site that serve a similar purpose. For example, many sites (including this book!) have a sidebar that serves as a way to navigate through content quickly, especially for sites with multi-step forms, or books.
This sidebar is contained within a semantic structural element. In this context, semantic just means it has a specific purpose. By extension, semantic structure elements are elements which serves to group content like a <div>, but in a way that is more specific to what we're trying to achieve. For example, the <header> element serves as a semantic structural element for the header of a page. Usually this contains general information about the page (such as a title), or navigational tools such as links to different sections of the site.
One excellent feature in Chrome is the Chrome DevTools. We will discuss this in more depth later when we discuss debugging, but one feature of the DevTools that are worth paying special attention to is the Element Inspector.
While on any webpage, you can right click and click "Inspect" (or "Inspect Element"), which will open up the Elements view of DevTools. In this view, you can see the entire HTML file that the current webpage is displaying, and all of the elements within it.
- In the sidebar of this book you can see links to other sections of the book.
- Right click on the words "Course Overview", and click Inspect.
- You will notice this opens the Elements view, and it will highlight the element you just inspected. In this case, it's an
<a>element with a href to course-overview.html. - This element is contained within multiple nested structural elements.
Can you determine which structural elements this is contained within?
Are any of the structural elements that this is contained within considered semantic structural elements? If so, which one(s)?
The following are the Semantic Structural Elements that we should be aware of for this course.
| Element | Tag | Purpose |
|---|---|---|
| Header | <header> | Almost always on the top of the page as a "strip" or "banner", serves to provide general information or navigational links. |
| Navigation Bar | <nav> | Provides navigational links, usually on multi-page content or forms. Often on the side of a page as a sidebar, but this isn't required. |
| Main Content | <main> | The main content of the page. Usually the largest section, this contains the primary information the page is conveying. |
| Footer | <footer> | A "strip" or "banner" of information along the bottom of the page. This usually contains information that is not intended to generally be accessed but should be available, such as copyright information. |
Introduction to Specific Elements
So far, we have discussed many different forms of text-based elements where the purpose of the element was to display or modify text in some way, such as paragraph elements and heading elements. We've also learned about how to use divisions to "section off" multiple elements at the same time, for example to hide many elements at once.
Some elements have specific meanings and purposes, and you should be aware of them and how to use them. In this section, we'll discuss lists, media, and tables. In the next section, we will discuss forms and how basic interactivity can be achieved using them.
Lists
Lists allow you to group sets of related items or information together. For example, you can use a bulleted list to express point-form ideas. You can use a numbered list to express how to achieve something in a step-by-step way.
In HTML this is accomplished using two types of lists, unordered lists and ordered lists. By default, HTML will use basic bullet points for unordered lists, and numerical bullets incrementing from 1 for ordered lists.
Unordered Lists
Unordered lists are lists where the items do not have any ordering associated to them. They are commonly identified using bullets. An example in real life is a grocery list, if you need to get eggs, milk and sugar to bake a cake -- the order you get those items in is irrelevant. You need all three in order to bake a cake, in any order.
To create an unordered list, we use two tags: ul to define the list itself, and li for each item contained within the list. Using our shopping list example, an unordered list of our items.
<p>To bake a cake, we need:
    <ul>
        <li>Eggs</li>
        <li>Milk</li>
        <li>Sugar</li>
    </ul>
</p>
Ordered Lists
Ordered lists, on the other hand, are for when the ordering of your list items does matter. If we extend the analogy for the cake, in the process of baking you have to do things in a certain order or your cake will not turn out. It's not possible to bake the cake first, then mix the milk and flour together.
<p>With your eggs, milk, and sugar, you should:
    <ol>
        <li>Mix everything together</li>
        <li>Place in a cake tin</li>
        <li>Bake</li>
    </ol>
</p>
Media
Often you will want to share non-text media on a webpage, and this is typically achieved by using specific tags for each media type.
Images
Images are added to a page using the <img> tag. This tag has a required attribute, src which specifies the location of the file. This file can be local to your filesystem, or can be an external link to a file hosted on the web.
There is also an alt attribute which specifies the text provided when an image fails to load, or provided to screen-readers to describe an image. While not required by HTML, this should always be provided for accessibility reasons.
<img src='cat.png' alt="A cat sleeping on a jacket.">
Sound
Similarly, the <audio> element allows you to play audio files directly in the browser. This element commonly uses the controls attribute, which adds audio controls to the browser directly. Within the content area of the <audio> element, you must add <source> elements which provide audio files to be used by the browser. For example, if we have an audio recording of a cat meowing, our HTML might look like this:
<audio controls>
    <source src="meow.ogg" type="audio/ogg">
    <source src="meow.mp3" type="audio/mpeg">
</audio>
Videos
Finally, the <video> element provides the ability to play videos. Like the <audio> element, you may provide a controls attribute to enable the ability to control the media playback. Additionally, you should specify width and height attributes to ensure the video is reasonably-sized.
You may also provide text within the content area of the <video> element, and that text will only be rendered if the video player is not able to be rendered.
<video width="480" height="320" controls>
    <source src="cat.mp4" type="video/mp4">
    This text is only displayed if the browser cannot render the video element.
</video>
Tables
A table is a common way to display data that is multi-dimensional, or sometimes to display data where a list would be too cumbersome. Tables are created using four elements:
<table>- the main table element which specifies the entire table.<tr>- the table row element, which creates a new row.<td>- the table data element which specifies a cell within a row.<th>- the table header element, which you use instead of<td>for header information, rather than data.
By default, the <th> element bolds and centers the headers of a table. This can be modified through CSS.
A basic table representing products for sale might be:
<table>
    <tr>
        <th>Product Code</th>
        <th>Product</th>
        <th>Price</th>
    </tr>
    <tr>
        <td>APP13</td>
        <td>Apples (kg)</td>
        <td>$4.00</td>
    </tr>
    <tr>
        <td>B4N4N4</td>
        <td>Bananas (kg)</td>
        <td>$3.00</td>
    </tr>
</table>
Forms
When you are collecting user-submitted information, you need to be able to send this to a server somehow. This is often done by using HTML Forms. A form is simple: it's a container that holds information that will be submitted to a server. At the core, a form is just an element with other nested elements contained within it.
<form>
    <input type="text">
    <input type="checkbox">
    <input type="submit">
</form>
Input Element
In order to collect information, HTML Forms include <input> elements, which allows the user to input information in different formats. This element includes several attributes which are useful to us for defining the data that gets submitted.
Several input types we will use include:
| Input Type | Description | Usages |
|---|---|---|
| text | A text field for user-submitted text. | Any time you should receive text from a user, such as gathering their name for a pizza order. |
| password | A text field for user-submitted text where the text is hidden. | Passwords or other sensitive information. |
| checkbox | A multi-select of options that will be sent together. | Anywhere multiple options are valid, such as pizza toppings. |
| radio | Like a checkbox, except only one option is valid. | Type of crust, since your pizza can't be both thin and thick crust. |
| date | A date picker. | To pick dates. |
| submit | A button to submit a form. | Most forms include a submit button unless they rely on JavaScript to do something unique. |
For a complete list of <input> types, see MDN Web Docs.
Select Element
The first way to add information we will discuss which you are already familiar with from your day-to-day life is a select box, which is used when you know the different options a user could choose. Selects are very helpful for ensuring data integrity, by preventing the user from submitting anything except for the pre-determined information you'd like them to.
<select id="pizza" name="pizza">
  <option value="veggie">Vegetarian</option>
  <option value="canadian">Canadian</option>
  <option value="meat">Meat</option>
  <option value="cheese">Cheese</option>
</select>
On this page, this select is rendered1 like so:
In this code, we introduce the value and name attributes. These attributes work together to allow the select to build data that can be sent to the back end server that the form is submitting to. For example, in the above example you can imagine the following data gets sent to a server when you select the veggie option.
{
  "pizza": "veggie"
}
If you selected the canadian option instead, the name would be the same, but the value would be different. This is very helpful when combined with more complicated forms to ensure you can parse the information that is being sent to you.
{
  "pizza": "canadian"
}
Since this book contains custom CSS, a default select will look different without styling.
Label Element
When creating forms, we can use labels to associate text directly to an input. Beyond just using a generic text element, this achieves more by being programmatically linked to the input. This helps us in a few ways:
- We are able to trust that screen readers and other accessibility tools will be able to parse information about our inputs.
- It increases the physical area of the form inputs, meaning it's easier to select, especially on a mobile device where you use touch controls.
Labels use the for attribute to specify the id of the element which they are labelling. For example, given our pizza selector above, we might use the following label:
<label for="pizza">Select your pizza:</label>
<select id="pizza" name="pizza">
  <option value="veggie">Vegetarian</option>
  <option value="canadian">Canadian</option>
  <option value="meat">Meat</option>
  <option value="cheese">Cheese</option>
</select>
HTML Elements Reference
The Elements referenced on this page are the elements which you are expected to be able to understand, use, and explain by the end of this course.
Elements List
| Element | Tag | Purpose | Introduced |
|---|---|---|---|
| Section Headings | <h1> -> <h6> | Section headings provide a way to differentiate text from the main body text, for example in titles or subtitles. | Weeks 1-3 |
| Paragraph | <p> | Paragraph elements are used to indicate paragraphs, and provide a blank line before and after the paragraph. | Weeks 1-3 |
| Line Break | <br> | The line break element tells the browser to render a carriage-return character. The line break element is an example of an empty or void element. | Weeks 1-3 |
| Anchor | <a> | The anchor element is used to create Hyperlinks. You must use the href attribute to provide the reference the anchor tag is pointing to. | Weeks 1-3 |
| Division | <div> | The division element is the most general structural element, which allows you to create separate sections of your page. | Weeks 1-3 |
| Header | <header> | The header is a semantic structural element, almost always on the top of the page as a "strip" or "banner", serves to provide general information or navigational links. | Weeks 1-3 |
| Navigation Bar | <nav> | The navigation bar is a semantic structural element which provides navigational links, usually on multi-page content or forms. Often on the side of a page as a sidebar, but this isn't required. | Weeks 1-3 |
| Main Content | <main> | The main content of the page is a semantic structural element. Usually the largest section, this contains the primary information the page is conveying. | Weeks 1-3 |
| Footer | <footer> | The footer is a semantic structural element, usually as a "strip" or "banner" of information along the bottom of the page. This usually contains information that is not intended to generally be accessed but should be available, such as copyright information. | Weeks 1-3 |
Module 2: Styling and CSS
In this module, we will focus on the basics of what a Web Page is, how they're structured, and how they can link to other pages. Primarily focusing on HTML, we will learn how HTML Elements work, how the page is structured, and some level of interactivity provided directly by HTML such as forms and form processing.
Module Objectives
When you have completed this module, you should feel comfortable that you
- Can style basic web pages with CSS.
- Understand how to use HTML classes and ids to help style elements with more specificity.
- Are able to use the Chrome Devtools for debugging CSS and HTML.
Cascading Style Sheets
Cascading Style Sheets (CSS) is a type of stylesheet language that is used to change the visual appearance of a page. CSS is by far the most widely used stylesheet language, and is relevant for any web development role. CSS is responsible for describing how HTML elements should be rendered on a screen, and is responsible for providing the rules describing how they look.
Why use CSS?
The biggest reason to use CSS is for separation of content and style. When you are writing content for a web page, you don't want to have to think about how it looks. Similarly, when you're thinking of how a web page will look, you don't want to have to know the specific content that will appear on the page, although knowing the general type of content (long form, short form, images, etc.) will help make well-reasoned decisions.
Other reasons to use CSS are reusability and maintainability. If you know you want a significant vertical gap between elements in the page, rather than having to remember to add 3 or 4 <br> elements after each element, you can just modify the vertical spacing of your <p> element. This helps significantly in both reducing the effort required to make changes, as well as ensuring you don't make mistakes.
Finally, we can use CSS to help aid the usability of our website from an end-user perspective. The difference between a well-styled and a poorly-styled website is night and day, and good styling is very important for allowing all users to use your site.
When using CSS you should keep accessibility in mind. A common mistake made by developers is assuming that everyone has normal colour vision. With roughly 4.5% of the world's population having some form of colour blindness, it can safely be assumed that as long as your site serves more than a handful of people, you need to use colours responsibly.
How to use CSS?
CSS is a single language. Regardless of how you use it, you are still writing CSS code. As the web has evolved, there are several different ways to write CSS.
Inline CSS
Inline CSS allows you to write CSS code directly in an element. This is done using the style attribute of an HTML element, and provides the least amount of setup required to use CSS code. In the following example, the CSS code is written directly in the paragraph element and modifies this specific paragraph element to be different than anything else on the page.
<p style="color: blue; font-size: 20px;">This text is blue and larger.</p>
Inline CSS is simple to use, but is not acceptable for use in this class, and is strongly discouraged for use elsewhere. This is because it breaks the principles we discussed earlier.
- It does not separate content and style, as you must modify the elements directly.
- It is not reusable or maintainable as you must add it to each element you want to modify.
- It significantly increases the likelihood of CSS bugs by relying on the developers to update this correctly.
Internal CSS
Internal CSS takes the idea of being able to do CSS directly in your HTML file provided by inline CSS but it separates your concerns by bringing it to its own location within the file. This is done within the head of the file.
<!DOCTYPE html>
<html lang="en">
<head>
    <meta charset="UTF-8">
    <meta name="viewport" content="width=device-width, initial-scale=1.0">
    <title>Internal CSS Example</title>
    <style>
        p {
            color: green;
            font-size: 18px;
        }
    </style>
</head>
<body>
    <p>This text is green and slightly larger.</p>
</body>
</html>
Internal CSS is better than Inline CSS, as it at least reduces the likelihood of CSS bugs. However it still requires maintaining the CSS between HTML files, and quickly grows to be unwieldy in projects larger than a few files. For this reason, Internal CSS is also not acceptable for use within this class. Some web frameworks use a form of Internal CSS, and so you may see this in the industry depending on what you work on.
External CSS
Lastly, external CSS fully separates the CSS code from the HTML code, and we use the CSS by linking the two together. When we do this we must use a separate (external) file, and point our HTML file to this external file. Using the Internal CSS example above, converting this to external would involve defining two files, with the example provided below.
Please note that in the following example, the href points to styles.css This is a common example file name and so you'll see it a lot, especially if you use AI tools. Note that the filename could be anything. The important bit is that the rel attribute is defined as stylesheet, and the href attribute points to the correctly named file.
HTML File (index.html)
<!DOCTYPE html>
<html lang="en">
<head>
    <meta charset="UTF-8">
    <meta name="viewport" content="width=device-width, initial-scale=1.0">
    <title>External CSS Example</title>
    <link rel="stylesheet" href="styles.css">
</head>
<body>
    <p>This text is green and slightly larger.</p>
</body>
</html>
CSS File (styles.css)
p {
    color: green;
    font-size: 18px;
}
Basic CSS Syntax & Structure
CSS is broken into two main components, a selector and a declaration block. The selector defines what you're styling, and the declaration block defines how you're styling it. Re-using our example from above
/* The selector is p -- and selects all the paragraph elements for modification. */
p {

    /* All the code within the curly braces are declarations,
        stating how we'll modify the paragraph element. */

    color: green; /* First declaration modifies the color. */
    font-size: 18px; /* Second declaration modifies the size. */

    /* Note that each declaration is ended with a semicolon ; */
}
We will go into more detail on selectors in the next chapter, but the element selector described above is the most common selector you will use for now.
CSS Properties
There are a lot of different things you can do with CSS. Each change you might want to make is done using CSS properties, and we've already discovered some through our usage so far in class. For example, the color property specifies the color of text within an element, and the background-color property specifies the color of the background.
Properties
The following table contains a list of properties we will use in this course, as well as examples of how they can be used.
| Property | Description | Example |
|---|---|---|
color | Sets the text color of an element. Can use color names or other color definitions such as hex values. | color: blue; or color: #0000FF |
background-color | Defines the background color of an element. | background-color: yellow; |
font-size | Controls the size of the text. | font-size: 16px; or 1.2em; |
margin | Adds space outside an element’s border. | margin: 10px; or 5% 10px; |
padding | Adds space inside an element’s border. | padding: 10px; |
border | Defines a border around an element. | border: 2px solid black; |
width | Sets the width of an element. | width: 200px; or width: 50%; |
height | Sets the height of an element. | height: 100px; or auto; |
text-align | Aligns text within an element. | text-align: center; |
There are far too many CSS properties to provide an exhaustive list within this book. Instead, you should treat the above as a reference for what sort of properties exist. Whenever you need to use CSS properties, you should use the available resources to you on the internet to help discover what might be best for your needs. In particular, MDN Web Docs has an exhaustive CSS Reference that can help you find CSS properties you might need to use.
Units
In some of these properties, you will notice various different types of units being used. There are several different types of units, which broadly break down into fixed units and relative units.
Fixed Units
Fixed units are those which meet an exact specification, such as x number of pixels wide. You may use these for certain tasks, but they can cause issues with responsiveness, where a page does not appear correct on screens of different sizes.
| Unit | Description | Benefits | Drawbacks |
|---|---|---|---|
px (Pixels) | Fixed unit representing exact screen pixels. Example: font-size: 16px; | Precise control over element sizes, consistent across devices. | Not responsive; may not scale well on different screens. |
Relative Units
Relative units on the other hand, scale based on the definition you provide or automatically as needed. There are many different types of relative units you can use, and we will go over these in the labs.
| Unit | Description | Benefits | Drawbacks |
|---|---|---|---|
% (Percentage) | Relative to the parent element’s size. Example: width: 50%; | Flexible and responsive to container size. | Can be unpredictable if parent element's size isn't clearly defined. |
em | Relative to the font size of the parent element. Example: font-size: 1.5em; (1.5× parent’s font size) | Scales with text, useful for accessibility. | Can lead to unexpected results if nested (em values compound). |
rem (Root EM) | Relative to the root <html> element’s font size. Example: font-size: 1.5rem; (1.5× the root font size) | Avoids compounding issues with nested elements; consistent sizing. | Still depends on the base font size (often 16px by default). |
vw (Viewport Width) | Percentage of the viewport width. Example: width: 50vw; (50% of the screen width) | Adapts to screen size, great for full-width layouts. | Can cause elements to shrink too much on small screens. |
vh (Viewport Height) | Percentage of the viewport height. Example: height: 100vh; (fills the full screen height) | Useful for full-screen sections. | Can cause content to overflow on small screens. |
auto | Automatically adjusts based on content and context. Example: height: auto; | Lets elements dynamically size based on their content. | Less predictable, may not provide precise control. |
CSS Selectors, Attributes, and Classes
In the previous chapter, we discussed one type of selector, which is the element selector. This selector is the easiest to understand, as you simply select all of a certain type of element such as modifying the paragraph element color attribute with p {color: blue;}.
Sometimes though, you won't want to modify every single element on a page. Using this book as an example, on the left in the chapter list you see each chapter is a separate <li> element. Some of these elements are styled differently. Depending on which theme you have this book loaded in, you will note the inaccessible chapters are greyed out, the chapter we're on right now is highlighted, and the rest of the chapters have a default color that matches the rest of the text on the page.
The chapters on the left are all using the list item <li> element. Using your inspector, can you identify:
- What is unique about the currently selected page?
- What is unique about unavailable pages?
Based on that information, how many different styles do we have defined for the list items in the navbar on the left?
Basic Selectors
The three most common selectors used are the element selector, class selector, and ID selector.
Element Selector
The element selector is the most basic type of selector, and is what we've seen so far. In this, you apply a generic style to all elements of a particular type. If we want to modify all h1 elements to be blue, we could use the following CSS code.
h1 {
    color: blue;
}
Class Selector
A class selector is more specific than an element selector. Rather than modify all of a particular element, we want to only modify elements which have a certain class. This is very powerful as it allows us to make sweeping changes to groups of elements without having to modify them individually. This is a key component of why CSS allows us to increase the reusability of our code.
Perhaps we have a site which uses paragraph tags everywhere, but we want certain types of paragraphs to be for warnings. Those paragraphs might have a class called "warning", and we can style that class differently than the rest.
The class selector is used with a period followed by the class name.
index.html
<p> This is a regular paragraph. </p>

<p class="warning">This paragraph has the warning class associated to it.</p>
styles.css
.warning {
    background-color: #FFD6D7;
}
ID Selector
There are times when we want to be so specific that we need to modify a single element. In these cases, you might think that you should use inline CSS - but even in these cases you should still use external stylesheets for readability and maintainability.
The ID Selector is even more specific than a class selector, and refers to a specific HTML id. As you cannot have more than one element with the same id in a document, you can use these to style specific elements as needed. This is used extensively with <div> elements, for example when making custom content areas within a page.
The id selector is used with a hash symbol (#) followed by the id of the element.
index.html
<div id="pizza-table-area">
    <!-- Code here for a table, including headings, the table itself, etc. -->
</div>
styles.css
#pizza-table-area {
    background-color: red;
}
It's common that a particular element on your page might match more than one selector, for example a CSS file might contain a rule for the p element, another rule for the warning class, and a rule for a specific id as well.
In this case, CSS follows the rule that has the highest specificity. lements are the least specific, followed by classes, and then ids are the most specific. Inline styling has the highest specificity, but you should avoid using inline styling and consider refactoring your CSS if you find yourself needing to use it to increase specificity of your CSS.
Specificity Order (From Least Specific to Most)
Element Selector -> Class Selector -> ID Selector -> Inline CSS
Grouping Selectors
If you wish to apply the same styling to more than one element, for example modifying the colour of all headings, you can group selectors prior to the declaration block. Grouped selectors should be separated with a comma.
h1, h2, h3 {
    color: red;
}
More Advanced Usage
There are many additional ways to scope CSS selectors that will be useful to you as you progress through your careers.
Attribute Selectors
You can selectively style an element based on the attribute of the element you have selected, for example styling links which include https in the href.
[href^="https"] {
    color: blue;
}
Pseudo-Elements
There are several pseudo-classes and pseudo-elements you may use as well as part of a CSS selector. Pseudo in this context refers to the fact they don't actually exist as a class, or as an element on the page, but the concept is known to us. For example if you want to style a link based on when you hover over it, you can do so with a:hover { }. The anchor tag never actually has a hover class written, but your browser knows to treat an element being hovered over with your mouse as though it does.
Similarly, you can style the first or last element of within other elements using first-child and last-child such as p:first-child { }. Try it out!
Debugging Web Applications
When doing web development, bugs are inevitable. Sometimes you will break things, other times you will work on fixing things other people broke, and sometimes you will have no idea why things are broken at all. Being comfortable with that and feeling capable of resolving these issues is critical for success.
Chrome DevTools
The primary tool you will use for debugging web applications in chromeis Chrome DevTools. DevTools has a variety of tools that enable you to quickly debug, test, and edit changes to a webpage.
Getting Started with DevTools
Devtools is installed automatically by Chrome. You can open it by pressing F12 on any webpage. 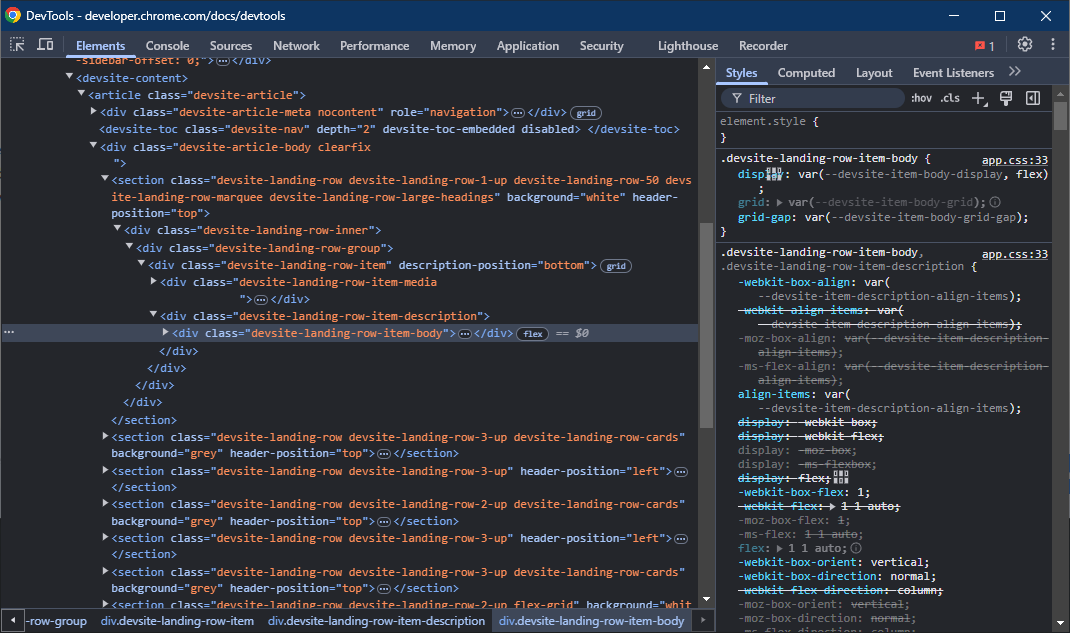
When you do this, you will see a variety of panes available to you along the top, each pane has a unique purpose. Some of the panes you will use most often are described below. The descriptions below are not exhaustive, and you should review the DevTool Docs for a complete list of functionality if required. Instead, this page will provide some basics that will help you during your academic journey and early career.
1. Elements
The Elements pane provides an interface to view and edit the DOM. Functionally for the purpose of this class, you can consider this the HTML that is being rendered, but there are differences between HTML and the DOM.
You can open the Elements pane directly to a specific element by right clicking it and clicking Inspect. This makes it very easy to find an element you can see visually, where finding it directly in the DOM might take a while.
In this view, you can edit and manipulate anything you'd like, and you'll immediately see your changes update in the browser. This can be useful if you're not sure how a specific change will impact the view of your page and want to just test and check.
Computed
In the Computed Tab of the Elements Pane, you can see exactly what styling is being rendered and why. This is very helpful for debugging CSS, as often you will find the visual behaviour of your CSS isn't what you'd expect. When you select an element, the computed tab will update to show you the CSS attributes the element has. When you drop down the attribute, you can see the Source of where this attribute is coming from, which can help you uncover the root cause of any issues you might be having.
Event Listeners
The Event Listeners tab shows you any active Event Listeners on a particular element. You can use this tab to ensure you have applied custom event listeners correctly, or to confirm why a particular event listener isn't firing when you expect it to.
2. Sources
The Sources pane provides an interface to view all files loaded on a page, which allows you to inspect and manipulate the entire source code of a website. This goes beyond the scope of the elements pane, as you can edit CSS, JavaScript, and anything else directly here.
The Sources pane is the source code of your page, and so it is the source of truth. If your page looks entirely wrong, like it might if you had the wrong HTML file loaded, the sources pane will help you uncover the problem.
3. Network
The Network tab displays all outbound requests your browser makes, and the responses to them. This will be expanded on significantly in COMP 206 when we are integrating front and back-ends together.
4. Recorder
The Recorder tab allows you to start working with User Journeys. When developing web pages, your ultimate goal is to provide a web page that a user is able to interact with. A User Journey is just a set of instructions that a user might use to do something on your site. For example, in order to log in a user might:
- Load your webpage.
- Click the Login button.
- Type in their username.
- Type in their password.
- Press enter.
Even this simple user journey can be made incredibly painful if you don't think about the end-user experience, and so User Journeys are a helpful way to think about what steps exactly are required to do something on your site.
Introduction to Git
Git is a version control system (VCS) which allows you to handle changes to code over time. The key difference between a VCS and just saving your file is that a VCS will allow you to "go back in time" and edit things in the past, whereas saving only usually allows you to go back to the last time you saved.
During the installation of git, you can generally follow the defaults suggested by the installer. However, when it asks you to select a text editor, you should not use the default suggestion of Vim unless you know what you're doing. Select another program such as Notepad++.
To install git, follow the instructions on Git SCM's Installing Git guide.
When you have finished installing, you should restart your terminal to ensure the changes take effect.
What is a commit?
A commit is like a snapshot of your code at a single point in time. The way git handles commits is by tracking changes, so your commits can be thought of as a series of changes over time.
| Commit # | Addition | Deletion | Snapshot |
|---|---|---|---|
| 1 | Hello World | Hello World | |
| 2 | , my name is John Smith | Hello World, my name is John Smith | |
| 3 | Doe | Smith | Hello World, my name is John Doe |
Google Drive Example
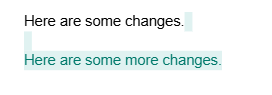
One example that is usually fairly familiar is the idea of how Google Drive (or most auto-saving document tools) handle saving. You don't have to specify when you'd like to save, instead, Google Drive assembles a list of changes as you type, so you can go back in time.
Then, when viewing the Version History tab, you can see specific changes that you made as differences (or diffs), which are displayed like the image below.
Commit Flow
Since a commit is a snapshot of a state in time, it represents files in a committed state. While you're doing work, your files will go through the following states:
Unmodified (No changes) – The file is identical to the last committed version, meaning no changes have been made since the last commit.
Modified (Changes unstaged) – The file has been changed but has not yet been added to the staging area (git add has not been run).
Staged (Changes staged) – The file has been added to the staging area using git add, meaning it is ready to be committed.
Committed – The file’s changes have been saved in the repository’s history with git commit.
There is also a fifth state when a new file is added to the working directory without being added to git, which is an untracked file.
Basic Usage
At it's core for working with a single branch and single repository, you will do the following actions:
- Make changes to your code.
- Add them to the staging area to prepare to make a commit with the command
git add <files>. - Validate your staging is the way you expect with
git status. - Commit your files with the command
git commit -m "<your commit message>"
This will allow you to use git to help preserve your progress through time.
At its core, git is saving more things than saving through your filesystem, but it's not saving in more locations. If your laptop dies, or your hard drive fails, you still lose all your work. Do not treat git as though it's a viable backup for your work.
If you put your code in a private repository on GitHub it could be considered resembling a backup, but there are still concerns such as relying on GitHub not deleting your repository, which they could do for example in the event of you violating their terms.
Never commit schoolwork to a public repository on GitHub or any other site, as that is equivalent to sharing your code and is a violation of academic policy.
What is a branch?
A Git branch is a pointer to a specific commit in your repository's history. When you create a new branch, Git essentially makes a lightweight reference to a commit, allowing you to work independently from the main development line.
This can be helpful, especially when testing or doing work that you may need to throw away. You can do all the work on your separate branch, and then decide whether or not you'll merge the branches together.
What is remote?
Everything up until now assumes you're working independently, but the biggest value add of git is being able to easily share work and collaborate. This is done using a shared remote repository. A remote repository is essentially a copy of the local version that is hosted online and accessible to others. When done in this way, the remote repository is usually considered the "true" version of the code, and the local repository is considered your local changes.
Using a remote repository is made easier using a remote hosting service, the most common of which is GitHub. When using GitHub, you will set up a remote version of your repository and keep them in sync using the git commands git push and git pull, to push up and pull down work respectively.
Git Command Reference
Basic Commands
The basic commands below you are required to know, and should be able to describe their usage on a quiz.
| Git Command | Description | Usage |
|---|---|---|
| git init | Initializes a new Git repository in your current directory. This sets up all the necessary Git metadata. | git init |
| git add | Stages changes (new, modified, or deleted files) so they are ready to be committed. It tells Git which changes to include in the next commit. | git add <file> or git add . (to add all changes) |
| git commit | Records the staged changes in the repository's history. A commit should include a message describing the changes. | git commit -m "Your commit message" |
| git log | Displays a list of commits in the repository's history, showing details like commit ID, author, date, and commit message. | git log (can be used with additional options, e.g., git log --oneline) |
| git status | Shows the state of the working directory and staging area, including changes that have been staged, changes not staged, and untracked files. | git status |
| git reset | Resets the current HEAD to a specified state. It can be used to unstage files or undo commits, depending on the flags used. | git reset <commit> or git reset --hard <commit> (to discard changes) |
Additional Commands
The following additional commands are not required for this course, but you will need them regularly and you may find it useful to understand them.
| Git Command | Description | Usage |
|---|---|---|
| git stash | Saves changes that are not yet committed so you can work on something else without losing progress. It removes the changes from the working directory but keeps them stored for later use. | git stash |
| git stash pop | Applies the most recently stashed changes back to the working directory and removes them from the stash list. | git stash pop |
| git revert | Creates a new commit that undoes the changes introduced by a previous commit, without modifying the commit history. | git revert <commit> |
| git branch | Lists all branches in the repository, creates a new branch, or deletes an existing branch. | git branch (list branches) or git branch <branch-name> (create a branch) |
| git checkout | Switches to a different branch or restores a specific commit/file. (Deprecated in favor of git switch and git restore for some use cases.) | git checkout <branch> (switch branch) or git checkout <commit> -- <file> (restore file) |
Module 3: Dynamic Sites and JavaScript
In this module, we will focus on how to make pages dynamic using JavaScript, and what JavaScript is used for in web development.
Module Objectives
When you have completed this module, you should feel comfortable that you
- Understand JavaScript event handling, how it works, and how to apply it.
- Are able to make basic interactivity using events in JavaScript.
- Are comfortable combining JavaScript, HTML, and CSS all together.
The HTML Document Object Model (DOM)
HTML is the markup language that represents the objects on our page, but that only gives us half of what we need to make an interactive website. Interactivity requires modifications, and in order to be able to modify our HTML, we need a standard way to refer to these HTML elements and interact with them. This is where the DOM comes into play. The DOM is created by the browser when a page is loaded, and represents all of the content, structure, and style of the page. You can think of the DOM as the interface between the HTML, and the outside world. JavaScript is the programming language we use to manipulate the DOM.
DOM Events
When the user interacts with the DOM, this triggers events to fire. All an event is referring to is a thing that happened. For example, the most obvious event is a click event, which is triggered when a user uses their mouse to click something.
Common types of DOM Events
There are many, many events referring to all sorts of different things that can happen during a user's journey through a webpage. Modern browsers are very powerful and so you can interact with events in many ways, with the intent of making it easier for people to use the internet.
1. Mouse Events
Triggered by mouse actions such as clicks, movement, or hovering.
click: Fires when an element is clicked.dblclick: Fires when an element is double-clicked.mouseover: Fires when the mouse enters an element.
2. Keyboard Events
Triggered when the user interacts with the keyboard.
keydown: Fires when a key is pressed down.keyup: Fires when a key is released.
3. Form Events
Triggered by interactions with form elements.
submit: Fires when a form is submitted.change: Fires when an input value changes (after losing focus).input: Fires when the value of an input changes (in real-time).focus: Fires when an element gains focus.blur: Fires when an element loses focus.
4. Window Events
Triggered by actions on the browser window.
load: Fires when the whole page (including all resources) is loaded.resize: Fires when the window is resized.scroll: Fires when the page is scrolled.
5. Clipboard Events
Triggered when users copy, cut, or paste content.
copy: Fires when content is copied.cut: Fires when content is cut.paste: Fires when content is pasted.
Event Handling
Since the DOM provides us with events for almost any type of user interaction imaginable, we have lots of options for what we might want to do with those events. This is the basis for Event Handling. When we have an event that triggers, and we do something in response, we have handled that event.
Event Handling Flow
In order to handle events with JavaScript, we need to do a few things to handle an event.
The steps below might seem complicated at first, but think about it like any other type of event in real life, and it's not so bad. You need to know what you're responding to, where it happens, and what your response will be. It's like hearing a doorbell and deciding to answer the door:
- What am I expecting to fire an event -> The doorbell.
- What event am I listening for? -> The ring.
- What am I going to do about it? -> Answer the door.
| Step | Context | Action |
|---|---|---|
| 1 | HTML | Understand and create (if needed) the element to respond to. |
| 2 | HTML | Give the element an id or class so it can be referenced in JavaScript. |
| 3 | JavaScript | Create the action to take after the event occurs. |
| 4 | JavaScript | Use document.querySelector() or similar to select the element. |
| 5 | JavaScript | Add an event listener linking the element, event type, and the action. |
| 6 | The Browser | The event fires. |
| 7 | JavaScript | The event listener calls the function—handling is complete! |
Selectors
In order to attach an event listener to an element, we need to first select the element so that JavaScript knows what we're talking about. Just like in CSS, we can use the same type of selectors to work with elements in JavaScript. It's important that you're comfortable using the querySelector method, and getElementById.
let button = document.querySelector('#clickyBtn');
Callback Functions
A callback function is most simply described as a function that is called once another function is complete. In the case of our event listeners, we pass a callback function to it to say "When you see the event has happened, call this function." When passing callback functions, you do not need to call them. You pass the function name without the parameters.
myFunction   // Yes
myFunction() // No
Registering the Event Listener
When we have an element to work with, we can register, or add the event listener using the addEventListener method. This method is a function of the element, and so it is accessed using the syntax:
button.addEventListener('event', callback);
Anonymous Callback Functions
Both here and in the example you will see us pass named functions as a callback. However, JavaScript allows you to create anonymous functions on-the-fly, which you will see fairly regularly especially in the context of event handling. For example, we could choose not to name a function that does nothing except log a few messages to console, and instead write the following
button.addEventListener('click', () => {
    console.log("I have been clicked!");
    console.log("Please stop clicking me.");
})
Creating an Event Handler
Let's build an example event handler. To keep things simple, we'll use a button as the element we plan to respond to. The event we will listen for is a click event, meaning someone has clicked our button. When the button is clicked, we will respond by changing the colour of an h1 element above the button to something else. We'll refer to the chart from the event handling page to ensure we did all the steps correctly as we go.
| Step | Context | Action |
|---|---|---|
| 1 | HTML | Understand and create (if needed) the element to respond to. |
| 2 | HTML | Give the element an id or class so it can be referenced in JavaScript. |
| 3 | JavaScript | Create the action to take after the event occurs. |
| 4 | JavaScript | Use document.querySelector() or similar to select the element. |
| 5 | JavaScript | Add an event listener linking the element, event type, and the action. |
| 6 | The Browser | The event fires. |
| 7 | JavaScript | The event listener calls the function—handling is complete! |
Step-by-step Example
Starting with the HTML file, we need to:
1. Understand and create the element to respond to.
<!-- For page readability sake, I've cut out most of this file except the body. -->
<body>
    <!-- We know we will want to modify the h1, so let's add it. -->
    <h1>This is a title with boring, black text.</h1>

    <!-- The button we will respond to. -->
    <button>Click me!</button>
</body>
2. Give the element an id or class so it can be referenced in JavaScript.
Once we have this done we are ready to get started, but we'll notice very quickly it's hard to reliably select an element in JavaScript without some way to tell it apart from other elements. If I create another button in the future, I probably don't want that second button to also change the colour of the h1.
To the point of the doorbell analogy from before, we need to specify which doorbell we're responding to -- it would be quite tiring if every single doorbell in our city rang in our house.
<body>
    <h1>This is a title with boring, black text.</h1>

    <!-- Here we've added an id to be able to easily select. -->
    <button id='colorChangeBtn'>Click me!</button>
</body>
Don't forget! If you don't include your JavaScript file in your HTML using the <script> tag, it won't execute! This is a common mistake and you can spend a lot of time trying to fix it before you realize.
<body>

    ... other code ...

    <!-- We include this at the bottom to ensure it's
         loaded after all our elements. We'll handle this
         a bit more gracefully in the future. -->
    <source src="event-demo.js"></source>
</body>
3. Create the action to take after the event occurs.
The next step we'll take is creating the thing that we will do in response to the action. I like to recommend thinking about your response first, because it can be easier to ensure it works separately. It's best to know that your code works before you add it to an event listener, so you are only debugging one thing at a time.
function changeTitleColor() {
    // Let's assume for now that we only have a single h1 element on the page.
    let title = document.querySelector('h1');

    // With this selected, now we can modify the title properties to change its color.
    title.style.color = '#FF0000';
}

// Let's make sure our function works by calling it. Once we know it works, we'll remove this line.
changeTitleColor();
4. Use document.querySelector() or similar to select the element.
We saw this already in use in the previous step, but it's important to call out specifically because it gets forgotten a lot! We need a way to actually access the button to apply the event listener, so let's ensure we have it named as a variable.
let button = document.querySelector('#colorChangeBtn');

// By logging the button, you can ensure that you correctly selected it. We can remove this after.
console.log(button)

function changeTitleColor() {
    // function code here
}
5. Add an event listener linking the element, event type, and the action.
At this point, we have our button accessible to JavaScript via a variable. We also have the action we want to take when the button is clicked. So now all we have to do is register the event listener.
// .. the rest of our code ..

button.addEventListener('click', changeTitleColor);
There's something important to notice in the above code. We didn't call the function when we passed it to the addEventListener function. Instead, we just passed the function as a parameter. This is because we don't want to change the color right away, instead we want the event listener to call this function in the future if the button is clicked.
And, done!
Now if we open the HTML file in the browser, we'll notice that our h1 is still a boring black color. However, when we click the button, our h1 changes to bright red!
Our completed code is below. Feel free to copy it into your own editor and experiment with it. Even if you feel you understand, experimentation is the best way to solidify your learning.
event-demo.html
<!DOCTYPE html>
<body>
    <h1>This is a title with boring, black text.</h1>
    <button id="colorChangeBtn">Click me!</button>

    <script src="event-demo.js"></script>
</body>
</html>
event-demo.js
let button = document.querySelector('#colorChangeBtn');

function changeTitleColor() {
    let title = document.querySelector('h1')

    title.style.color = '#FF0000';
}

button.addEventListener('click', changeTitleColor);
Extra Resources
This Extra Resources section is an ongoing list of resources that may be helpful to you during this course. Please regularly refer to this section of the Playbook and feel free to suggest additions.
Resources
| Link | Description |
|---|---|
| MDN Web Docs | Information on Web Development basics as compiled by the Mozilla foundation. |
| w3schools | w3schools provides resources on HTML that tend to be slightly more accessible than MDN Web Docs. I recommend referring to MDN Web Docs first, but use w3schools to help solidify understanding. |
| VSCode | VSCode is a code editor which we will be using in this course. If you prefer a different editor or IDE you are free to use that as well, but I will only provide support for VSCode. |
HTML
| Link | Description |
|---|---|
| HTML Attribute Reference (MDN) | A reference list of all HTML Attributes. |
CSS
| Link | Description |
|---|---|
| CSS Properties Reference | A reference list of all CSS Properties. |
Quiz 1 Study Guide
The first quiz of the course will include any content we covered in weeks 1-4. You can review details of what that was on the following pages:
You may also want to refer to the HTML Elements Reference to ensure you're comfortable answering questions about elements we've covered so far.
Key Concepts
In addition to reviewing the content above, you should feel comfortable answering the following questions:
- What is the difference between the head element and the header element?
- What is an attribute, and what does it do?
- Do all elements have content?
- What are nested elements?
- What are structural elements?
- What are semantic structure elements, and how do they differ from regular structural elements?
- What are some examples of structural elements?
- What does HTML stand for?
- What is a markup language?
- What is Hypertext?
- Describe Frontend Development, Backend Development, and Full Stack development.
- Describe another type of Web Development in addition to the three in the previous question.
Quiz 2 Study Guide
The first quiz of the course will include any content we covered in weeks 4-6. You can review details of what that was on the following pages:
You may also want to refer to the HTML Elements Reference to ensure you're comfortable answering questions about elements we've covered so far. Lastly, you likely want to briefly review sections 1.1 through 1.3, as much of the content builds upon earlier content in this course.
Key Concepts
In addition to reviewing the content above, you should feel comfortable answering the following questions:
- What are the two types of lists? When should we use each?
- What is the required attribute for an image element?
- What attribute of an image element is used for accessibility purposes? Why is it used?
- What does the
controlsattribute do for the audio/video elements? - Where and when does text placed inside of the video element render?
- When might we use tables?
- Create valid code for a table containing 3 rows and 4 columns.
- What is the purpose of a form element?
- What are input elements, and how do they work?
- What is the difference between a text input, and a password input?
- Is it possible to have a password input be used for something other than passwords?
- What is the difference between a radio button and a checkbox?
- How does a select element make it easier for us to collect user form data?
Quiz 3 Study Guide
The third quiz of the course will include any content we covered in weeks 6-9. You can review details of what that was on the following pages:
- Cascading Style Sheets
- CSS Selectors, Attributes, and Classes
- Debugging Web Applications
- Introduction to Git
Key Concepts
In addition to reviewing the content above, you should feel comfortable answering the following questions:
- What is the benefit of separation of content and style?
- How does CSS help with usability of a website?
- What is a common mistake made with CSS regarding accessibility?
- Describe three main ways of using CSS, and what is preferred?
- Describe the difference between a selector and a declaration in CSS.
- What is a CSS Property?
- How do you use an element selector?
- What is the purpose of Chrome's DevTools?
- What is the difference between the Elements pane and the Sources pane?
- What is a git commit?
- What is the purpose of the git status command?
- What is the difference between git and GitHub?
Quiz 4 Study Guide
The fourth and final quiz of the course will include any content we covered in the course. The majority of the content will focus on the content discussed in Weeks 10-14, surrounding Event Handling. You should ensure you are comfortable with:
The quiz will focus primarily on the Event Handling concepts. At this point in the course, you are still expected to know the basics of how HTML works, and the basics of how CSS works. There will be no written questions that require you to remember specifics of CSS and HTML syntax, as in the real world you would be able to Google these things.
Do ensure to still study CSS selectors, as they are also used in JavaScript
Do ensure you understand the overall concepts from Modules 1 and 2.
Don't worry about syntax details from Modules 1 and 2.
Key Concepts
In addition to reviewing the content above, you should feel comfortable answering the following questions:
- What is an HTML attribute, and what does it do?
- Do all HTML elements have content?
- What are structural elements?
- When might we use tables?
- What is the purpose of a form element?
- How does a select element make it easier for us to collect user form data?
- Describe three main ways of using CSS, and what is preferred?
- What is the purpose of Chrome's DevTools?
- What is the difference between git and GitHub?
- What is an example of a Mouse event?
- What is an example of a Keyboard event?
- Describe a way you might use the
changeevent? - When you pass a function to the addEventListener() function as a parameter, do you call the function you pass?
- Write an event listener attached to the click event.
- Why do you need to pass an event listener to a specific element?
Course Coding Standards
This page may update prior to when your first assignment is handed out. Expect there to be some changes.
In this course, please follow the following basic coding standards to ensure consistency.
HTML
1. Use Proper Doctype Declaration
Always start each HTML file with <!DOCTYPE html>.
2. Use Specific Elements Over Generic Elements
Where it makes sense, use appropriate tags such as <header> rather than a more generic <div> tag.
3. Indent Nested Elements
All nested elements should be indented.
<!-- Correct-->
<div>
    <p>This paragraph is properly indented.</p>
</div>

<!-- Incorrect -->
<div>
<p>This paragraph is not indented at all.</p>
</div>
4. Use Lowercase Element and Attribute Names
All element and attribute names should be lowercase.
<!-- Correct-->
<img src="image.jpg" alt="A descriptive text">

<!-- Incorrect -->
<IMG SRC="image.jpg" ALT="A descriptive text">
5. When using images, always provide an alt attribute for accessibility.
<!-- Correct -->
<img src="cat.jpg" alt="A playful cat">

<!-- Incorrect -->
<img src="cat.jpg">
CSS
1. Use External Stylesheets
Avoid inline styling for maintainability, and prefer instead external stylesheets.
<link rel="stylesheet" href="styles.css">
2. Use Hex, RGB, or Named Colours Consistently
You may use any valid color definition, but you should use them consistently. Hexadecimal is recommended.
color: #ff6600; /* Hexadecimal */
3. Use Hyphenated Class and ID Names
Use hyphens for separating words in class or ID names.
.main-content { }